Pantry Organization: A Simple System Anyone Can Keep
A messy pantry costs you time and money. You buy a third jar of cinnamon because you cannot find the other two, the pasta goes stale behind the cereal, and every dinner starts with digging. Good pantry organization fixes all of that, and it does not require expensive matching containers.
This guide gives you a simple pantry organization system in six steps. It works for a walk-in pantry, a single kitchen cupboard or a few shelves, and it is designed to stay organized after the first week, not just look nice for a photo.
Step 1: Empty Everything and Check Dates
Take everything out of the pantry and put it on the counter or the table. Yes, everything. You cannot organize a space you cannot see.
As you take items out, check the dates:
- Throw away anything expired, stale or open for too long.
- Donate unopened food you know you will not eat (check that it is not expired).
- Use soon anything close to its date. Put these items in a small “eat first” basket.
Then wipe the empty shelves and let them dry. This step alone often frees up a third of the space.
Step 2: Group Food Into Zones
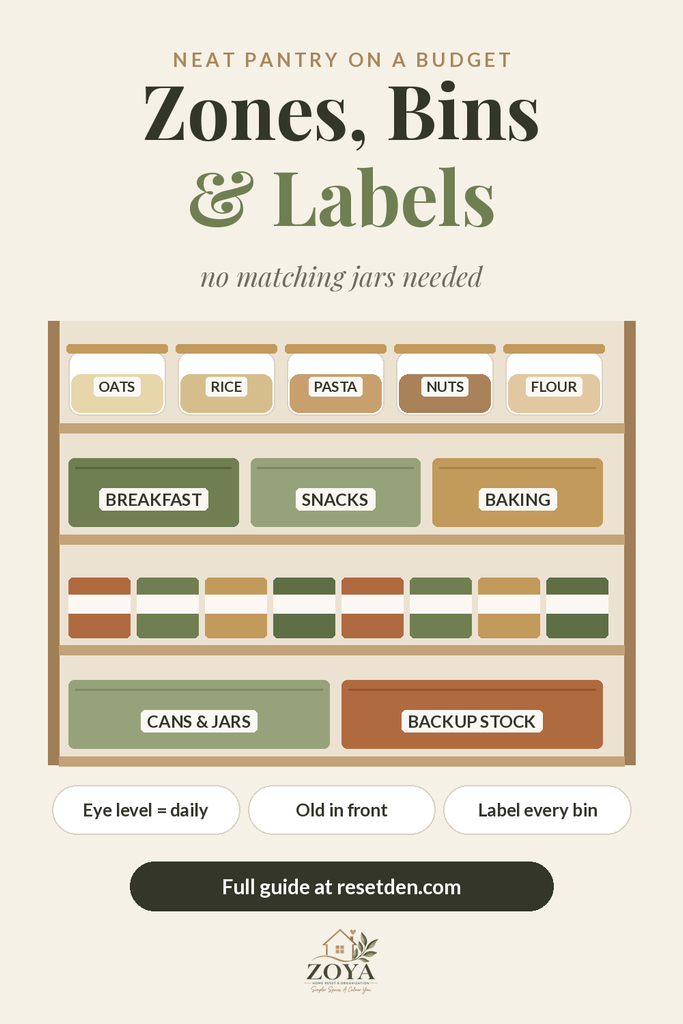
Sort what remains into groups, the way a grocery store does. Common pantry zones are:
- Breakfast: cereal, oats, spreads
- Pasta, rice and grains
- Canned goods and jars
- Baking: flour, sugar, baking powder
- Snacks
- Spices and oils
- Drinks: tea, coffee, juice
Each zone gets its own spot on a shelf. When everything in a group lives together, you see at a glance what you have and what you need to buy.
Step 3: Put the Right Things in the Right Place
Pantry organization works best when the most used items are the easiest to reach.
- Eye level: the foods you use every day, such as breakfast items and pasta.
- Lower shelves: heavy items like cans, bottles and bulk bags, and snacks kids can reach on their own.
- Top shelves: backup stock and items you use less often, like special baking supplies.
- The door: if your pantry has one, a door rack is perfect for spices and small packets.
Step 4: Use Containers and Labels Wisely
You do not need to buy a full set of matching jars. Start with what you have: clean glass jars, shoe boxes and small baskets all work.
A few rules make containers useful instead of just decorative:
- Use bins for loose items like snack bags, sauce packets and small boxes. Pull the bin out like a drawer.
- Use clear jars for dry goods you buy in bulk, such as rice, oats and pasta, so you can see when they run low.
- Label everything. A simple label on each bin and jar keeps everyone in the household putting things back in the right zone.
- Write the expiry date on the back of a jar when you pour food into it.
Step 5: Small Pantry Organization Tricks
If your pantry is a single cupboard, these tricks add space without new shelves:
- Shelf risers let you stack plates of cans in two levels.
- A turntable in a corner makes oils and sauces easy to reach.
- Under-shelf baskets use the empty space above short items.
- Stand boxes upright like books, with the label facing out.
- Store spices in a drawer with the labels on top, so you can read them all at once.
Step 6: Keep It Organized Every Week
The real test of pantry organization is week three, not day one. Three small habits keep it working:
- Put groceries away by zone. New items go behind old ones, so the older food gets used first.
- Keep a shopping list on the pantry door. When something runs out, write it down right away.
- Do a five-minute check once a week. Straighten the bins and move anything that is about to expire into the “eat first” basket.
Once a month, do a slightly deeper check as part of your Monthly Home Reset, which includes sorting the pantry and cleaning out the fridge.
Pantry Organization and the Rest of the Kitchen
An organized pantry makes every other kitchen job easier. Dinner is faster when you can see what you have, and the nightly Kitchen Reset takes less time when everything has a home.
If your kitchen has more stuff than space, start by letting go of what you do not use. The kitchen section of our Declutter Checklist lists the items people keep for no reason, from lidless containers to duplicate tools.
Related Guides
Too much in the pantry? Start with a quick kitchen declutter so you only organize what you really use.
Sorting the pantry? Finish the rest of the kitchen with our kitchen cleaning checklist.
Pantry Zone Map: What Goes Where
Use this map as a quick guide when you put everything back. It works for a walk-in pantry and a single cupboard alike: just read “shelf” as “level”.
| Shelf | Best zones | Container idea |
|---|---|---|
| Top shelf | Backup stock, holiday baking supplies, small appliances you rarely use | Labeled bins with a handle, so you can pull them down safely |
| Eye level | Breakfast, pasta and rice, everyday snacks | Clear jars and open baskets |
| Lower middle | Canned goods, jars and sauces | A shelf riser or can rack, so back rows stay visible |
| Floor | Drinks, bulk bags, potatoes and onions (kept in separate baskets) | Sturdy bins and breathable baskets |
| Door | Spices, seasoning packets, foil and wraps | An over-the-door rack |
Budget Swaps for Pantry Containers
Good pantry organization is about zones and labels, not about how much you spend. Before you buy anything, try these free or low-cost swaps:
- Shoe boxes cut down to shelf height make perfect bins for snack bags and sauce packets.
- Clean pasta sauce and jam jars hold spices, seeds, nuts and small amounts of grains.
- Cereal boxes cut on a diagonal become upright holders for seasoning packets and envelopes.
- Dollar store baskets work as pull-out drawers on deep shelves.
- Masking tape and a marker make labels you can change when a zone moves.
Once you have used your system for a month, you will know exactly which containers you need, and you can replace the swaps one at a time.
Why Pantries Get Messy Again (and How to Fix It)
- No room for new groceries. If every shelf is packed to the edge, new items land wherever they fit. Leave a little empty space in each zone for the next shopping trip.
- Bulk buys without a home. A giant pack of paper towels or rice needs a planned spot, usually the top shelf or the floor. Decide where it goes before you buy it.
- Deep shelves hide food. Anything behind the front row is forgotten. Put the back row in a bin you can slide out like a drawer.
- Everyone has a different system. Labels on every zone mean the whole household puts things back in the same place, not just the person who organized it.
🌿 Not sure where to start?
Get the free 60-Minute Calm Home Reset Checklist: six simple steps with times, plus a 20-minute version for busy days.
Get the free checklist →Frequently Asked Questions
How do I start organizing my pantry?
Empty it completely, throw away expired food and wipe the shelves. Then group what is left into zones, such as breakfast, pasta, cans and snacks, and give each zone its own shelf or bin.
Do I need matching containers for pantry organization?
No. Matching containers look nice, but zones and labels matter much more. Clean jars, shoe boxes and baskets you already own work just as well.
How often should I reorganize my pantry?
A five-minute tidy once a week and a full check once a month keep the pantry organized. A complete reorganization is usually only needed once or twice a year.
Start With One Shelf
You do not have to do the whole pantry today. Empty one shelf, check the dates, and give it a single zone. Tomorrow, do the next shelf. In a week, your pantry organization will be done.
Want printable checklists for every room, including the kitchen? Get the ZOYA 7-Day Calm Home Reset Planner. Looking for more ideas? Browse all our organization guides.